

Introduction to Docker

Prerequisites
There are no specific skills needed for this tutorial beyond a basic comfort with the command line and using a text editor.
Open an Atmosphere instance
Go to Atmosphere and log in with your CyVerse credentials.
Click on ‘projects’ tab at the top of the page.
You should have a project called ‘Conatainer Camp 2021’; click on that tile.
You should already have a running instance called Ubuntu 18_04 NoDesktop Base. To confirm this look for a green dot and the word ‘Active’ under ‘status’.
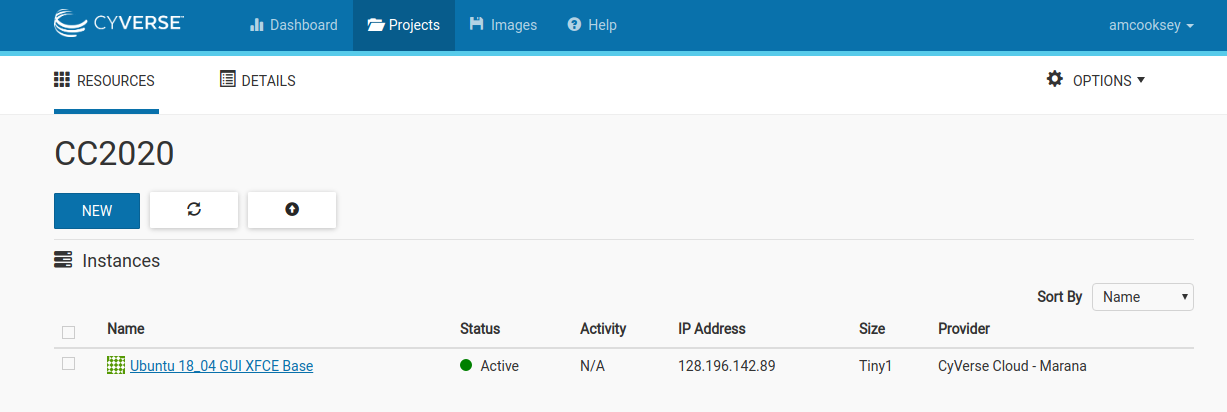
Copy the IP address for your instance
Open a terminal on your computer
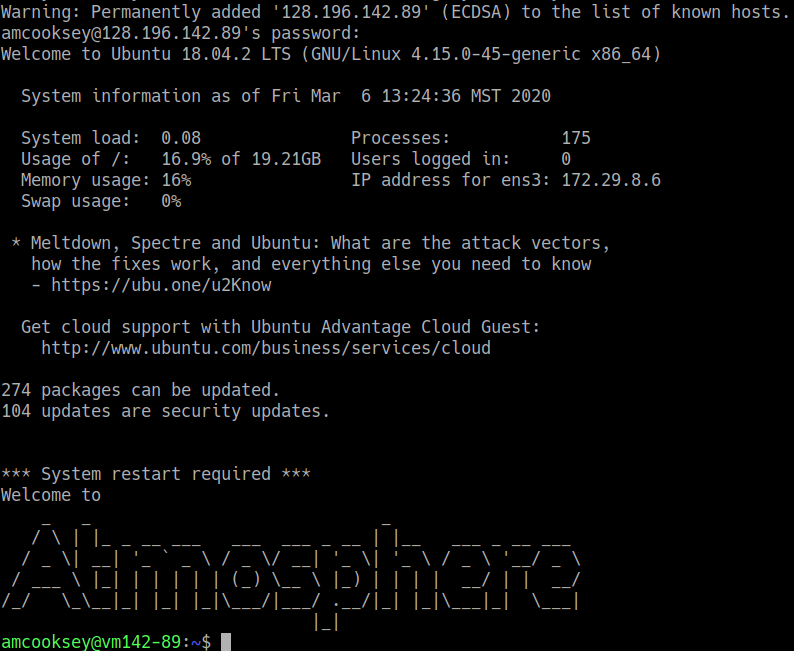
Connect to your Atmoshere instance via ssh using the IP address you copied
$ ssh <cyverse_username>@128.196.142.89
You will be asked if you are sure you want to continue–say yes.

If you see something like this (below) then you have successfully logged into your Atmophere instance.
Note
Installing Docker on your computer takes a little time but it is reasonably straight forward and it is a one-time setup. How to install Docker.
Docker installation is much easier on an Atmosphere instance with the ‘ezd’ command.
Docker pull
Go to Docker Hub and search for ‘hello-world’ in the search bar at the top of the page.
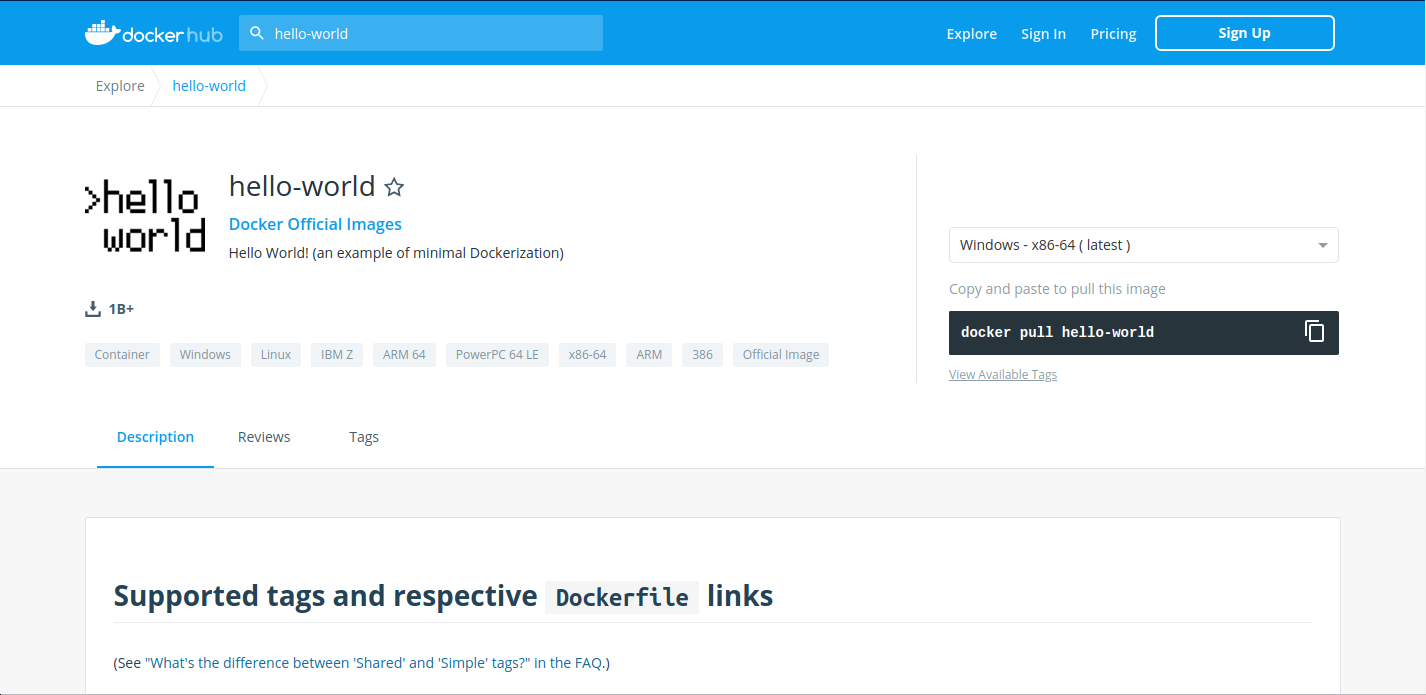
Click on the ‘tag’ tab to see all the available ‘hello-world’ images.
Click the ‘copy’ icon at the right to copy the docker pull command that we will need on the command line.
Now you will need to pull the image from the registry onto your computer. Use the ‘docker pull’ command you copied from the registry above.
Note
Depending on how and where you’ve installed Docker, you may see a permission denied error after running the $ docker run helo-world command. If you’re on Linux, you may need to prefix your Docker commands with sudo. Alternatively to run docker command without sudo, you need to add your user name (who has root privileges) to the docker “group”.
Create the docker group:
$ sudo groupadd docker
Add your user to the docker group:
$ sudo usermod -aG docker $USER
Log out or close terminal and log back in and your group membership will be initiated
$ docker pull hello-world:latest
Now list the files in your current working directory
$ ls -l
Where is the image you just pulled? Docker saves container images to the Docker directory (where Docker is installed). You won’t ever see them in your working directory.
Use ‘docker images’ to see all the images on your computer:
$ docker images
Docker Run
The single most common command that you’ll use with Docker is docker run (help manual).
docker run starts a container and executes the default entrypoint, or any other command line statement that follows run.
$ docker run hello-world:latest

Hello from Docker!
This message shows that your installation appears to be working correctly.

To generate this message, Docker took the following steps:
 1. The Docker client contacted the Docker daemon.
 2. The Docker daemon pulled the "hello-world" image from the Docker Hub.
(amd64)
 3. The Docker daemon created a new container from that image which runs the
 executable that produces the output you are currently reading.
 4. The Docker daemon streamed that output to the Docker client, which sent it
 to your terminal.

To try something more ambitious, you can run an Ubuntu container with:
 $ docker run -it ubuntu bash

Share images, automate workflows, and more with a free Docker ID:
 https://hub.docker.com/

For more examples and ideas, visit:
 https://docs.docker.com/get-started/
Note
To find out more about a Docker images, run docker inspect hello-world.
In the demo above, you used the docker pull command to download the hello-world image first.
$ docker run alpine:latest ls -l
total 52
drwxr-xr-x    2 root     root          4096 Dec 26  2016 bin
drwxr-xr-x    5 root     root           340 Jan 28 09:52 dev
drwxr-xr-x   14 root     root          4096 Jan 28 09:52 etc
drwxr-xr-x    2 root     root          4096 Dec 26  2016 home
drwxr-xr-x    5 root     root          4096 Dec 26  2016 lib
drwxr-xr-x    5 root     root          4096 Dec 26  2016 media
.........
When you executed the command docker run alpine, Docker looked for the image, did not find it, and then ran a docker pull behind the scenes to download the alpine image with the :latest tag.
When you run docker run alpine, you provided a command ls -l, so Docker started the command specified and you saw the listing of the alpine file system.
You can use the docker images command to see a list of all the cached images on your system:
$ docker images
REPOSITORY              TAG                 IMAGE ID            CREATED             VIRTUAL SIZE
alpine                  latest              c51f86c28340        4 weeks ago         1.109 MB
hello-world             latest              690ed74de00f        5 months ago        960 B
Images need to have an ENTRYPOINT set in their Dockerfile recipe in order for them to return a result when they are run. The hello-world image echos out the statement that it is present when it executes.
You can change the entrypoint of a container by making a statement after the repository/container_name:tag:
$ docker run alpine echo "Hello world"
Hello world
In this case, the Docker client dutifully ran the echo command in our alpine container and then exited. If you’ve noticed, all of that happened pretty quickly. Imagine booting up a virtual machine, running a command and then killing it. Now you know why they say containers are fast!
Now it’s time to see the docker ps command which shows you all containers that are currently running.
$ docker ps
CONTAINER ID        IMAGE               COMMAND             CREATED             STATUS              PORTS               NAMES
Since no containers are running, you see a blank line. Let’s try a more useful variant: docker ps --all
$ docker ps --all
CONTAINER ID        IMAGE               COMMAND                  CREATED             STATUS                      PORTS               NAMES
36171a5da744        alpine              "/bin/sh"                5 minutes ago       Exited (0) 2 minutes ago                        fervent_newton
a6a9d46d0b2f        alpine             "echo 'hello from alp"    6 minutes ago       Exited (0) 6 minutes ago                        lonely_kilby
ff0a5c3750b9        alpine             "ls -l"                   8 minutes ago       Exited (0) 8 minutes ago                        elated_ramanujan
c317d0a9e3d2        hello-world         "/hello"                 34 seconds ago      Exited (0) 12 minutes ago                       stupefied_mcclintock
What you see above is a list of all containers that you ran. Notice that the STATUS column shows that these containers exited a few minutes ago.
Try another command, this time to access the container as a shell:
$ docker run alpine:latest sh
Wait, nothing happened! Is that a bug? Well, no.
The container will exit after running any scripted commands such as sh, unless they are run in an “interactive” terminal (TTY) - so for this example to not exit, you need to add the -i for interactive and -t for TTY. You can run them both in a single flag as -it, which is the more common way of adding the flag:
$ docker run -it alpine:latest sh
/ # ls
bin    dev    etc    home   lib    media  mnt    proc   root   run    sbin   srv    sys    tmp    usr    var
/ # uname -a
Linux de4bbc3eeaec 4.9.49-moby #1 SMP Wed Sep 27 23:17:17 UTC 2017 x86_64 Linux
The prompt should change to something more like / # `` -- You are now running a shell inside the container. Try out a few commands like ``ls -l, uname -a and others.
Exit out of the container by giving the exit command.
/ # exit
Note
If you type exit your container will exit and is no longer active. To check that, try the following:
$ docker ps --latest
CONTAINER ID        IMAGE                 COMMAND                  CREATED             STATUS                          PORTS                    NAMES
de4bbc3eeaec        alpine                "/bin/sh"                3 minutes ago       Exited (0) About a minute ago                            pensive_leavitt
Docker images are cached on your machine in the location where Docker was installed. These image files are not visible in the same directory where you might have used docker pull <imagename>.
Some Docker images can be large. Especially Data Science images with many libraries and packages pre-installed.
Important
Pulling many images from the Docker Registries may fill up your hard disk!
To inspect your system and disk use:
$ docker system info

$ docker system df
To find out how many images are on your machine, type:
$ docker images --help
To remove images that you no longer need, type:
$ docker system prune --help
This is where it becomes important to differentiate between images, containers, and volumes (which we’ll get to more in a bit). You can take care of all of the dangling images and containers on your system. Note, that prune will not remove your cached images
        $ docker system prune
WARNING! This will remove:
  - all stopped containers
  - all networks not used by at least one container
  - all dangling images
  - all dangling build cache

Are you sure you want to continue? [y/N]
If you add the -af flag it will remove “all” -a dangling images, empty containers, AND ALL CACHED IMAGES with “force” -f.
In the previous example, you pulled the alpine image from the registry and asked the Docker client to run a container based on that image. To see the list of images that are available locally on your system, run the docker images command.
$ docker images
REPOSITORY                 TAG                 IMAGE ID            CREATED             SIZE
ubuntu                     bionic              47b19964fb50        4 weeks ago         88.1MB
alpine                     latest              caf27325b298        4 weeks ago         5.53MB
hello-world                latest              fce289e99eb9        2 months ago        1.84kB
.........
Above is a list of images that I’ve pulled from the registry and those I’ve created myself (we’ll shortly see how). You will have a different list of images on your machine. The TAG refers to a particular snapshot of the image and the ID is the corresponding unique identifier for that image.
For simplicity, you can think of an image akin to a Git repository - images can be committed with changes and have multiple versions. When you do not provide a specific version number, the client defaults to latest.
Note
We’ve added the --rm flag, which means the container will automatically removed from the cache when the container is exited.
When you start an IDE in a terminal, the terminal connection must stay active to keep the container alive.
Note, that your terminal is still active and you can use it to launch more containers. To view the running container, use the docker ps command
$ docker ps
CONTAINER ID        IMAGE                   COMMAND                  CREATED              STATUS              PORTS                             NAMES
561016e4e69e        jupyter/base-notebook   "tini -g -- start-no…"   About a minute ago   Up About a minute   8888/tcp, 0.0.0.0:8888->888/tcp   affectionate_banzai
Managing Data in Docker
It is possible to store data within the writable layer of a container, but there are some limitations:
The data doesn’t persist when that container is no longer running, and it can be difficult to get the data out of the container if another process needs it.
A container’s writable layer is tightly coupled to the host machine where the container is running. You can’t easily move the data somewhere else.
Its better to put your data into the container AFTER it is built - this keeps the container size smaller and easier to move across networks.
Docker offers three different ways to mount data into a container from the Docker host:
volumes
bind mounts
tmpfs volumes
When in doubt, volumes are almost always the right choice.

Volumes are often a better choice than persisting data in a container’s writable layer, because using a volume does not increase the size of containers using it, and the volume’s contents exist outside the lifecycle of a given container. While bind mounts (which we will see later) are dependent on the directory structure of the host machine, volumes are completely managed by Docker. Volumes have several advantages over bind mounts:
Volumes are easier to back up or migrate than bind mounts.
You can manage volumes using Docker CLI commands or the Docker API.
Volumes work on both Linux and Windows containers.
Volumes can be more safely shared among multiple containers.
A new volume’s contents can be pre-populated by a container.
First we need to get some data on our local machine (Atmosphere).
$ iinit

Enter the host name (DNS) of the server to connect to: data.cyverse.org
Enter the port number: 1247
Enter your irods user name: your_cyverse_username
Enter your irods zone: iplant


$ iget -r /iplant/home/shared/iplant_training/read_cleanup

$ ls -l
Choose the -v flag for mounting volumes
-v or --volume: Consists of three fields, separated by colon characters (:). The fields must be in the correct order, and the meaning of each field is not immediately obvious.
The first field is the path on your local machine that where the data are.
The second field is the path where the file or directory are mounted in the container.
The third field is optional, and is a comma-separated list of options, such as
ro.
-v /home/username/your_data_folder:/container_folder
$ docker run -v /home/amcooksey/read_cleanup:/work alpine:latest ls -l /work
So what if we wanted to work interactively inside the container?
$ docker run -it -v /home/amcooksey/read_cleanup:/work alpine:latest sh
$ ls -l

$ ls -l work
Once you’re in the container, you will see that the /work directory is mounted in the working directory.
Any data that you add to that folder outside the container will appear INSIDE the container. And any work you do inside the container saved in that folder will be saved OUTSIDE the container as well.
Docker Commands
Command |
Usage |
|---|---|
docker pull |
Download an image from Docker Hub |
docker run |
Usage: |
docker build |
|
docker images |
List all images on the local machine |
docker tag |
Add a new tag to an image |
docker login |
Authenticate to the Docker Hub requires username and password |
docker push |
Usage: |
docker inspect |
Usage: |
docker ps -a |
List all containers on your system |
docker rm |
Usage: |
docker rmi |
Deletes an image |
docker stop |
Usage: |
docker system |
Usage: |
Getting more help with Docker
The command line tools are very well documented:
$ docker --help
# shows all docker options and summaries
$ docker COMMAND --help
# shows options and summaries for a particular command
Learn more about docker
Fix or improve this documentation
- Search for an answer:
Ask us for help: click
 on the lower right-hand side of the page
Report an issue or submit a change: Github Repo Link
Send feedback: Tutorials@CyVerse.org